N.B. By default, Keycloak does not support two-factor authentication via SMS or email. Keycloak only supported two factors by default TOTP/HOTP via Google Authenticator and FreeOTP, but we may utilize 2fa Email and SMS with Service Provider Interfaces (SPI).
Keycloak: Identity and Access Management for Modern Applications, Keycloak enables single sign-on while also managing identity and access. You can easily add authentication to applications and secure services. There is no need to manage user storage or authentication. Everything is available right away. Advanced features include user federation, identity brokering, and social login.
They cover everything from reviewing what Keycloak has to offer businesses, management, and identity brokering, to enabling single-sign-on, LDAP or Active Directory sync, and more. Developers and system administrators no longer have to worry about storing and protecting user passwords with this IAM tool.
1- Installing and Running Keycloak
Run the following command to start the Keycloak server as a Docker container:
docker run -p 8080:8080 -e KEYCLOAK_ADMIN=admin -e KEYCLOAK_ADMIN_PASSWORD=admin quay.io/keycloak/keycloak:19.0.3 start-dev
Keycloak does not run with a default admin account, passing the environment variables KEYCLOAK_USER and KEYCLOAK_PASSWORD allows you to quickly create one.
If you want to run Keycloak without Docker, download the distribution from the Keycloak website. Open https://www.keycloak.org/downloads and then download the server’s ZIP archive. Simply extract this archive to a suitable location after downloading it.
You are ready if the installation goes well. For authentication, you’ll need the user, client, and realm. You are following this official tutorial; https://www.keycloak.org/docs/11.0/getting_started/#creating-a-realm-and-a-user
2. Custom Keycloak Email 2FA Authentication Provider
Keycloak is intended to address the majority of use cases without the need for special code, but we also want it to be adaptable. Keycloak provides several Service Provider Interfaces (SPI) through which you can implement your providers. Because Keycloak is built on SPIs, implementing a 2FA process flow yourself is not difficult. You are using the API and SMTP email protocol provided by Keycloak.
As previously said, the Authentication SPI is highly strong, but it is also the most difficult SPI in Keycloak, where you might ruin your authentication flow. If not correctly implemented, you may introduce attack vectors onto your system, making it unsafe. So, I strongly advise you to thoroughly study the server development documentation.
On GitHub, I’ve provided an example implementation of the SMTP Email Authentication SPI for Keycloak:
GitHub - mesutpiskin/keycloak-2fa-email-authenticator: 🔒 Keycloak Authentication Provider… 🔒 Keycloak Authentication Provider implementation to get a two factor authentication with a OTP/code/token send via…github.com
3. Configure 2FA Email Authentication Flow for SPI
After you’ve deployed the JAR profile to the /deployments or /provider directory, you’ll need to establish and setup a Keycloak authentication flow in your realm and utilize it in a binding to use the keycloak-2fa-email-authenticator.jar
- Configure Realm SMTP email settings in Realm/Realm Settings/Email.

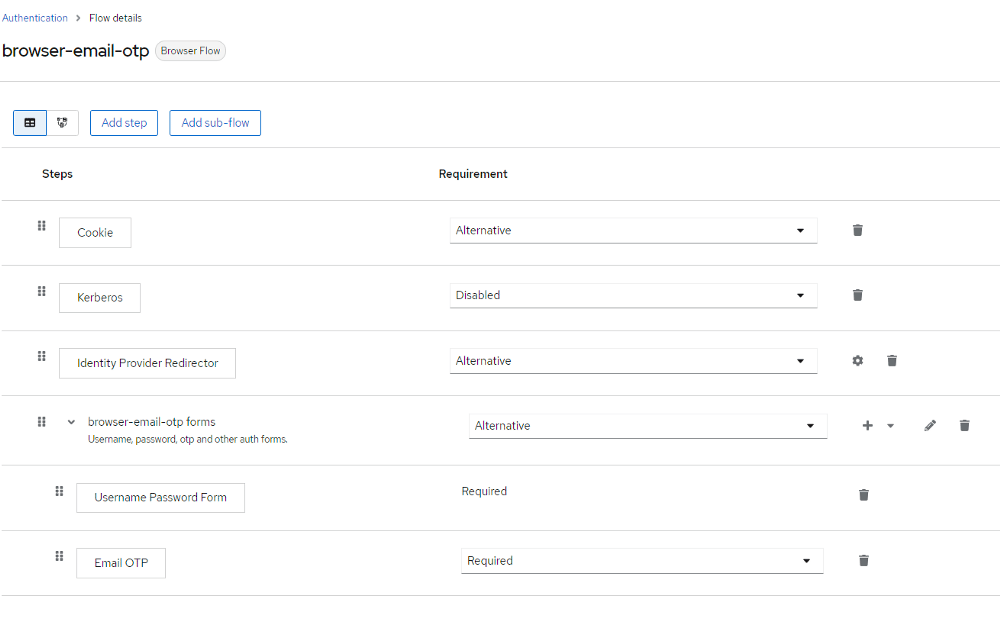
- Create (clone) a new flow for browser-based authentication and modify it to meet your requirements. Include an execution for “browser-email-otp-flow”

- Configure the “browser-email-otp-flow” execution phase using the parameters that are most appropriate for your needs.

- Set the newly established flow to “Browser Flow” in your realm’s admin console’s Authentication / Bindings tab.
OTP generation algorithm is very simple in generateAndSendEmailCode(). If you want to change the OTP code format then you can override this method and write custom code or use Keycloak SecretGenerator
private void generateAndSendEmailCode(AuthenticationFlowContext context) {
...
int emailCode = ThreadLocalRandom.current().nextInt(99999999);
...
}
